I haven't had a lot of time to work on things this past week. Life has just been way too busy. I did however eek out a little bit of time yesterday to fix/finish off the vibration table. I used some foam and springs to dampen the vibration and things seem to work wonderfully now! I'll have some pictures up soon as well as brief how-to.
I have also switched over to the glass method of scraping the tiles and let me tell you it makes a WORLD of difference. I found some already cut acrylic sheets at lowes for about $3 each that are just the right size for a mold. I picked up 5 of them and plan on getting about 10 more tonight!
I am also now doing a syrenge method instead of pouring from the sides. I bought a bottle that I can squeeze the plaster out of to do this, it isn't an actual syrenge. I plan on going to the restraunt supply store soon and picking up a few more bottles of different sizes depending how much plaster I am working with.
Also I have found that going with a 2 to 1 ratio of plaster to water by volume seems to work out fairly well for overall strength. Now to get to casting a bunch more bricks!!!
Ohh on another note my adsense account was disable because of invalid clicks! Not sure what that is about or how they determine that but I have now switched ad providers and will be looking at finding better ad networks for this blog in the future!
Showing posts with label casting. Show all posts
Showing posts with label casting. Show all posts
Monday, June 4, 2012
Thursday, May 24, 2012
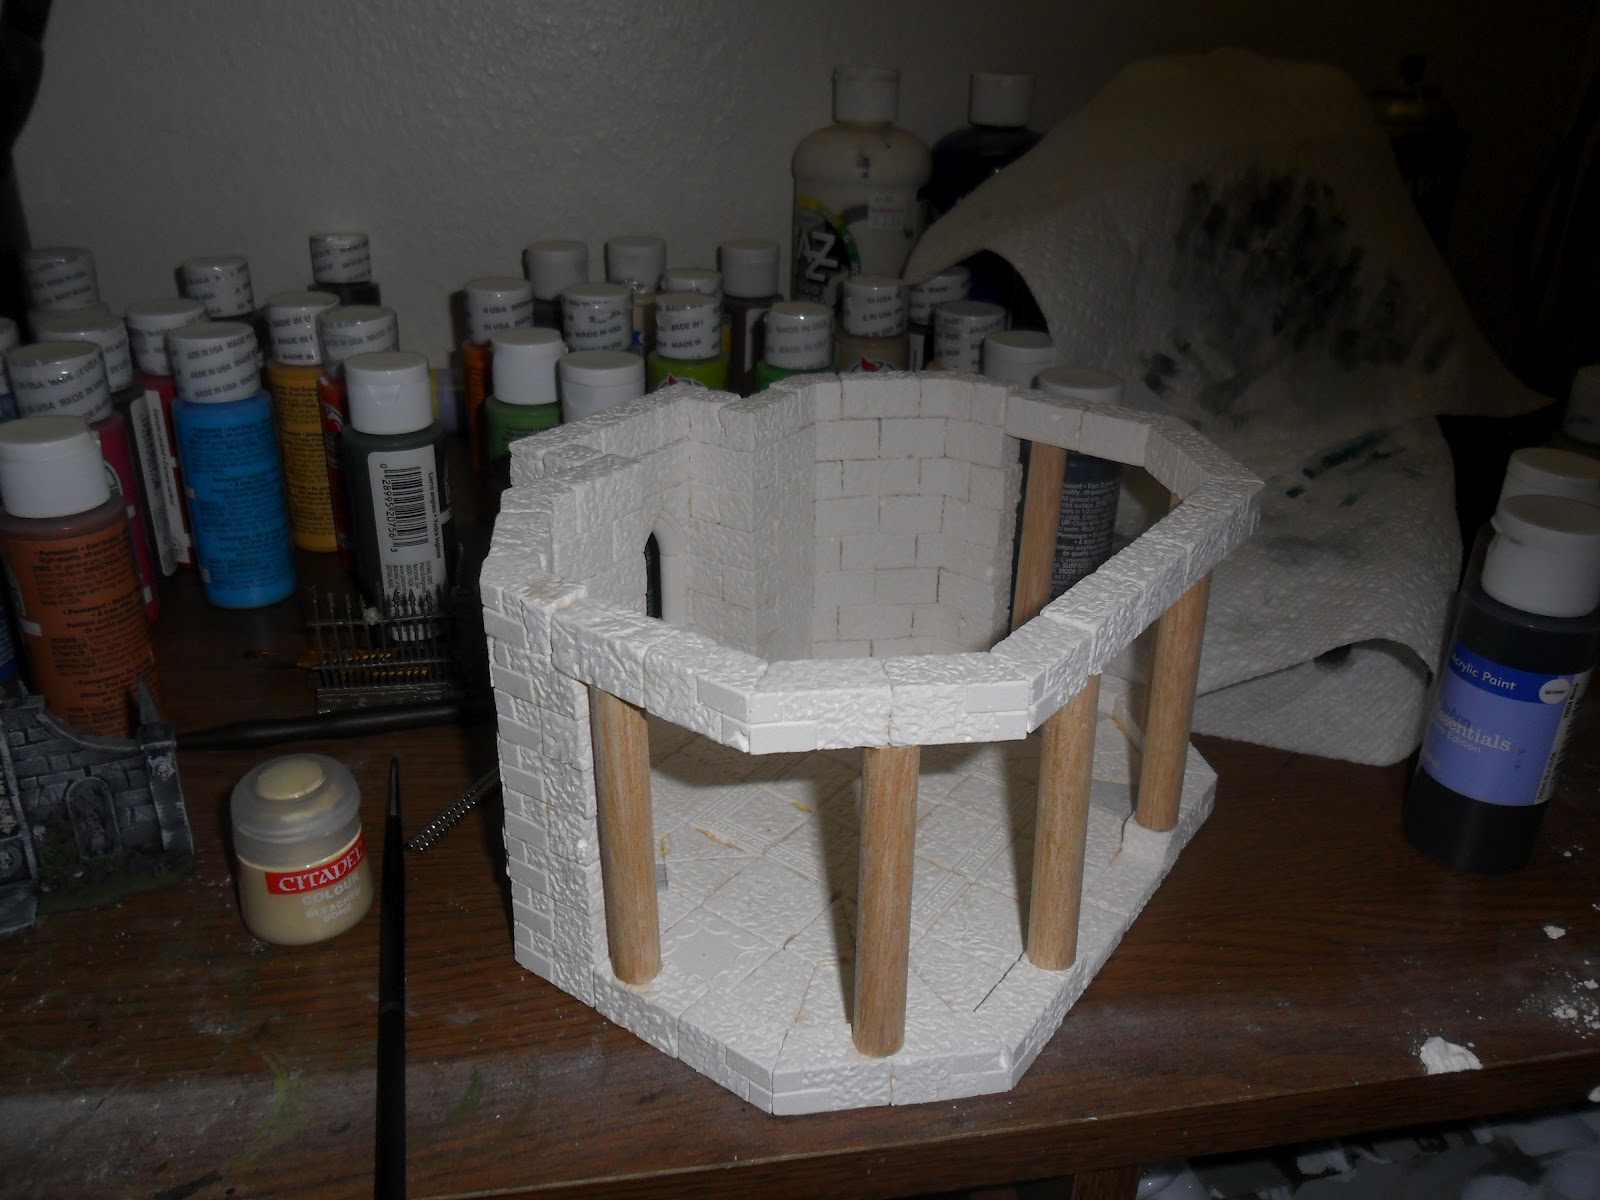
WIP: Temple of Aradoth update 2
Ok so I have finished the main temple. I might decide to put a roof on it but right now I like it open aired. I ran into some issue putting in the pillars and getting everything to line up the way I wanted. I tried dry building the pillar section upside down first and then putting all the pillars on at once but it didn't quite line up right. That's ok though, I am not concerned about high quality right now and mostly about getting designs completed and learning from the construction.
The piece is still going to look amazing once painted and placed on the base with the bridge. Here are some pics!


The piece is still going to look amazing once painted and placed on the base with the bridge. Here are some pics!


Friday, May 11, 2012
Complete: Castle Gate
I had an itch that I just had to scratch so I went and finished the castle gate. I dry brushed on a couple coats of lighter gray did some flocking and added some trees and voala it is done! Here are some pictures for your viewing pleasure.


The camera is definately good at showing those tiny spots I missed... Must be the flash lol. Might do some touch ups but I think this is pretty good for the first model with hirst arts bricks!
Thursday, May 10, 2012
WIP: Ruined Castle Gate Update 6
So I borrowed an air compressor so I could get some air brushing done. I did 2 coats one of the base black and one of the first color I would normally dry brush on. I cranked the air pressure down a bit and reduced the flow out of the pot so that it would stay mostly on the higher parts.
Here are some pictures!


Here are some pictures!


Project Status 1
I am going to do a weekly readers digest version of the status of my projects! This will not have any pictures and is just an idea of when stuff will get done.
Ruined Castle Gate:
The air compressor has stalled my progress here however the piece is done other then painting and final detail work. I am borrowing an air compressor and hope to have the piece done in the next couple days.
Gardens of Morr:
I have 2 of the buildings finished painting and almost complete with the main gate, just a couple details to add there. Once the air brush is working again I plan to do the first 2 coats of paint with the air brush for the remaining pieces which should save me time overall. Hopefully I will be done with the piece middle of next week.
Minas Tirith:
Working on designing the Citadel. I hope to have some sketches up soon of this and begin construction.
Gazebos:
I am still working on the dome pieces and have not made any progress here. Been focusing on casting blocks and working out kinks in that process.
Workspace:
I have more poly bins to mount to finish sorting. Also this weekend I will be installing a sink basin and running water to the shop. This will make things a lot easier. Also need to mount some peg board by my new bench.
Tools:
I made a couple table tops for casting on which are working well. I have the foam to use as a dampener for the vibration table but have yet to fix that. Might get to that this weekend but probably won't happen till next week.
Lots of stuff going on time to complete some of it!
Review: Woodland Scenics Rocks
So in prepration of completing the ruined tower last night I picked up some woodland scenics rock mold. It has 3 rocks in it and appears to be made of some sort of rubber. My big problem with the mold is that it doesn't have a flat base. It makes it a little bit of a challenge to cast. I ended up resting the edges on a pair of 2x4s so that it would sit flat.
The details in the rocks are awesome though and will look great to add a little spice to the bases of the terrain. For 10 bucks you can't really go wrong. I will probably pick up a few more molds to add some more variation to the rocks.
http://woodlandscenics.woodlandscenics.com/show/Item/C1234/page/1
Wednesday, May 9, 2012
WIP: Castle Gate Update 5
Ok so last night I had some time to take my gentle persuader (a.k.a hammer) and ruin up the gate piece I was working on. I made the decision to do this because the piece was just not going the way I wanted. I think I might of tried constructing something a little too big first!!! At an rate I ruined it up and put some rubble around the base and added a broken stair case. Check out the pictures below.


Tuesday, May 8, 2012
Casting Update
So I attempted to cast 16 molds again. This time however I put together a couple platforms with the baking mat on them for easy cleaning. I ran into a couple problems. The first one is clumping. I ran the plaster through a sifter before adding it to the water but with this quantity of plaster it still clumps up and is almost impossible to get to declump. I think I need a new mixing method rather then doing it by hand.
The second problem I ran into was shorting myself on plaster. I only could fill 14.5 molds. Oops...
The final problem was scrape time. I did manage to get them all scraped however the last ones were really really hard. I think switching to silver set 40 will help with this.
Below is a picture of the scraped molds drying in my paint booth. It is a small room that I have a space heater in and have the temp cranked up to around 90 degrees. It is warm in their.

Monday, May 7, 2012
Shopping list for the day
Need to pick up some silicone baking mats from the restraunt supply store as well as more poly bins. I may also pick up some silicone RTV but will probably wait on that.
I have found that the baking mats make for a great worksurface cover. The plaster does not stick to them at all really which is really handy for cleaning. I want to get at least 2 more but maybe 3 or 4 to cover the areas where I do the casting and drying.
I have found that the baking mats make for a great worksurface cover. The plaster does not stick to them at all really which is really handy for cleaning. I want to get at least 2 more but maybe 3 or 4 to cover the areas where I do the casting and drying.
Sunday, May 6, 2012

Weekend Update...
Quick weekend update. I have spent most of my time organizing and casting. I am borrowing a few molds from a fellow wargames terrain enthusiest. This puts me at 16 molds being cast at a time. Below are some pictures of one of the casts and the workspace updates. Here are the molds all layed out ready for pooring.

Here is the bowl of plaster ready to poor...

And all the molds filled but not scraped yet

The corner of the shop where I built a new bench.

New bench and some poly bins are installed.

Tons of blocks ready to be sorted.


Here is the bowl of plaster ready to poor...

And all the molds filled but not scraped yet

The corner of the shop where I built a new bench.

New bench and some poly bins are installed.

Tons of blocks ready to be sorted.

Saturday, May 5, 2012
Multiple casts take 2
So I just completed the scraping on a casting set I did. 16 molds all at once... Little crazy lol. I doubt that I will have more then 50% come out without air bubbles but we shall see. Kneed a bigger board to do that many at once.
Thursday, May 3, 2012
Multiple casts...
So this was my first attempt at casting 7 molds at the same time. While it didnt go as well as I had hoped I think most of the pieces will be fine. I waited a bit too long to scrape and I also mixed way more plaster then I needed. Need to get this down stat so I can cast 18 molds this weekend.
They are here!!!
The new molds I ordered the other day are here. This will fill out my collection nicely and give me a lot more flexiblity in my projects. I can't wait to start casting them tonight!!!
Wednesday, May 2, 2012
Wip: castle gate update 3
I have the first part of the bridge house done. Working on the second level of the towers. Work is slow but steady. I will have some other small pieces done here soon as well.

Monday, April 30, 2012
New Molds OTW
So I decided to buy some new molds. I am still working on the gate project (I will post an update on that later tonight) but I also have a couple other smaller projects comming up to work on. I went with 5 molds this time to get the 10% discount. Here is what I bought:
#53 Travelers Bridge Mold
#60 Prison Tower Mold
#54 Gothic Church Mold
#200 Wall Builder
#61 Turret Mold
Hope they get here this weekend!
#53 Travelers Bridge Mold
#60 Prison Tower Mold
#54 Gothic Church Mold
#200 Wall Builder
#61 Turret Mold
Hope they get here this weekend!
Tuesday, April 24, 2012
Wip: castle gate update 2
As you can see I have nit made a ton of progress. The weekend was way too sunny for me to start home in my shop. I plan to get more done during the week though. I added a second layer to the base if the first tower. This is to give new the height I need for the base of the bridge. I also created the main rails for the bridge and the floor and base layer for tower 2.
The first tower has some gaps in it including one bad one on the back window. After talking to some folks on the hirst arts message board I am going to use wood filler to fix the gaps before painting. The first run on the second tower went together a lot cleaner. I think this us because my casting has gotten better and my process for gluing.

Friday, April 20, 2012
WIP: Castle gate update
Here is a pic of the first tower for the gate. The bottom floor is almost complete. This weekend I will start the second tower and building the bridge across. I also have enough basic blocks to start work on a wizard tower.
The casting process head gotten a lot better. Recent casts have almost no air pockets. Hopefully I can fix the vibration table this weekend and eliminate any more air pockets.

Thursday, April 19, 2012
More on UltraCal30
So thickening up the mix has definately helped with the overall strength of the castings. The problem I am having now is that I am having trouble getting the plaster to fill all the details and release some of the air pockets. I believe once I get the vibration table working this weekend that this will help. Also I might try thinning out the mix just a bit and seeing if it remains strong when demolding.
Wednesday, April 18, 2012
Success!!!
So the problems I was having with the UltraCal30 seem to have been solved. I made the mix incredibly thick, a little bit thicker than pancake batter and the pieces were able to be demolded without breaking the details!!! Awesome Sauce!!! I still have some issues with air bubbles but nothing I am not also experiencing with the Merlins Magic. Also some of the pieces I cast earlier with the UltraCal30 have gotten incredibly hard. So it looks like I just need to refine the curing process to get the results I want. I am thinking about using some heat lamps in my paint booth to cure the blocks faster.
With all that said I realize that trying to do this project at my hobby desk in my home office is just not possible. So I will be cleaning up and re-organizing my shop to make this process better.
With all that said I realize that trying to do this project at my hobby desk in my home office is just not possible. So I will be cleaning up and re-organizing my shop to make this process better.
Subscribe to:
Posts (Atom)