I haven't had a lot of time to work on things this past week. Life has just been way too busy. I did however eek out a little bit of time yesterday to fix/finish off the vibration table. I used some foam and springs to dampen the vibration and things seem to work wonderfully now! I'll have some pictures up soon as well as brief how-to.
I have also switched over to the glass method of scraping the tiles and let me tell you it makes a WORLD of difference. I found some already cut acrylic sheets at lowes for about $3 each that are just the right size for a mold. I picked up 5 of them and plan on getting about 10 more tonight!
I am also now doing a syrenge method instead of pouring from the sides. I bought a bottle that I can squeeze the plaster out of to do this, it isn't an actual syrenge. I plan on going to the restraunt supply store soon and picking up a few more bottles of different sizes depending how much plaster I am working with.
Also I have found that going with a 2 to 1 ratio of plaster to water by volume seems to work out fairly well for overall strength. Now to get to casting a bunch more bricks!!!
Ohh on another note my adsense account was disable because of invalid clicks! Not sure what that is about or how they determine that but I have now switched ad providers and will be looking at finding better ad networks for this blog in the future!
Monday, June 4, 2012
Tuesday, May 29, 2012
Pay Per Post
Singing up for pay per post to try and make a little more money off this blog. I mean I might as well try and make all that I can right? In order to do this though I have to post a random sentence to verify this is my blog. So here is what was generated by pay per post!
All an eagle would really like, is a teapot
Pretty funny lol. Ok now lets see if I can get some advertisers to pay me to write stuff about them!
All an eagle would really like, is a teapot
Pretty funny lol. Ok now lets see if I can get some advertisers to pay me to write stuff about them!
Friday, May 25, 2012
DIY Silent Air Compressor
This article is posted on behalf of Adam and details how he built his silent aircompressor.

After getting tired of not being able to airbrush at night due to a very noisy compressor I set off on a task to build a nearly silent one. I built this compressor about two years ago.
Here is a list of the major parts I used in building my compressor.

Refrigerator compressor (I salvaged mine from a mini fridge that wouldn’t stay cold) (left)

A pressure regulator (110Psi was more than enough for hobby painting) (left)
 Pressure cut off switch (left)
 Air Tank (left)
If you are salvaging a compressor from a refrigerator, It is extremely important to properly evacuate all refrigerant from your donor refrigerator's system. Many shops will do this for free.
Cut the two copper tubes coming from the sealed compressor, Make sure to leave as much of the tube as possible. Once cut, avoid turning the unit upside down. Or the oil will spill out.
Follow the power cord into the wiring harness tracing the wires to their separate terminals on the capacitor. Mark both wires and terminals with masking tape or a marking pen to keep their proper configuration. Make note of wires at this location that will go to another set of terminals on 110v sealed compressor module (or "pump"), tape and mark these wires and terminals as well.
Remove the wiring to everything else except the capacitor and pump. Remove the compressor for the donor refrigerator. Save the rubber feet, they will help reduce noise and vibration when you mount the compressor to its new frame. Connect corresponding power cord wires to the capacitor and green ground wire to base of pump.
Gently bend both copper lines on the pump to point vertically. This will help keep the oil from spitting out or making its way down your feed line into your pressure vessel once it’s attached. Make sure the compressor is secured to prevent "lurching" or pulling wires loose from vibrations.
Plug it in and listen for motor sound: If the unit does not run, unplug it at once and check power cord wires. Note, one copper tube may spit oil at first. This is normal mark this tube as the supply line.
If no oil blows out as the unit is running, put a finger tip on the end of one of the copper lines and feel for the side blowing air. The line blowing air is the supply line and should be marked as such. 8
Following the diagram below and using the appropriate brass fittings and air hose connect the compressor supply line to a 3 way tee. On one end of the tee you will have your air tank with safety pressure release valve. On the other end connect air hose to a second tee with the Pressure Switch and pressure regulator. Finally, attach a quick disconnect to the pressure regulator.

Follow the wiring diagram for your pressure switch and connect the wires from the compressor as well as a grounded power cord.


For The air compressor intake you should install an air filter.

Or if you’re in a bind a wiffle ball at the end of the copper intake pipe with a coffee filter wrapped around it. This worked for me for the first few weeks.

Using the original rubber mounts and making it as level as possible, bolt the pump to a sturdy frame or base plate. I decided to make a nice wood box that sits over the 10 gallon air tank.

This compressor won't win any awards for its looks, but it's silent, cheap and fun to build. I plan to use what I have learned from this project on my next DIY, a silent vacuum chamber for investing.
WIP: Temple of Aradoth
Someone on one of the message boards I posted the latest set of pictures asked if I had any sketches of what the finished product would look like. Unfortunately I don't have any images of the finished product other then what is in my head. However I can try and describe the finished product in a bit more depth!
Basically I am going to build 2 mountains out of foam board insulation about 6 inches apart. One of them will have a winding path to the top. The other one will be larger and have the temple sitting attop it in the middle. There will be a bridge connecting the 2 mountains made out of gothic bricks. The bridge will have 2 archs in it. The first arch will be about 3 inches in height and the winding path will run under it. The second arch will go over the remainder of the vally between the 2 mountains. I am also contemplating putting a waterfall on the back of the larger mountain that has a small river that flows out from underneath the temple and putting a couple roman/greek statues outside the temple as you approach from the bridge.
Basically I am going to build 2 mountains out of foam board insulation about 6 inches apart. One of them will have a winding path to the top. The other one will be larger and have the temple sitting attop it in the middle. There will be a bridge connecting the 2 mountains made out of gothic bricks. The bridge will have 2 archs in it. The first arch will be about 3 inches in height and the winding path will run under it. The second arch will go over the remainder of the vally between the 2 mountains. I am also contemplating putting a waterfall on the back of the larger mountain that has a small river that flows out from underneath the temple and putting a couple roman/greek statues outside the temple as you approach from the bridge.
Interview: Itar from Itar's Workshop
This week I talk with Itar from Itars Workshop: http://www.itarsworkshop.com/catalog/index.php. He has some pretty cool and pieces for very reasonable prices. If you need to fill in some gaps in your terrain or don't have much of a budget to buy a large set of pieces all at once he is definately your guy!!! He has also given some helpful insite to the world of terrain manufacture.
.jpg) [TP] How long have you been in business?
[TP] How long have you been in business?
[Itar] We've been open since January 2009. So 3 years.
[TP] What do you use for the inspiration of your pieces?
[Itar] I find inspiration everywhere. If I'm doing a line of products, say torture equipment, I will Google whatever it is and use pictures of medieval torture equipment as a starting point. I've also stopped and looked at the building at my day job and thought "that would make a neat looking building in 6mm". Inspiration can strike anywhere, at any time.
[TP] What types of materials do you use for your pieces?
[Itar] I cast all my pieces in some sort of resin. I will occasionally use Hydrostone plaster for my personal custom pieces and for sculpting.
[TP] Are there any special suppliers you get your materials from? Any suppliers that have perticularly good service?
[Itar] I get a lot of my specialty resins from Smooth-on. I also get supplies from Sil-pak and Aeromarine Products.
[TP] What is your favorite terrain piece?
 [Itar] From the ones available on in my store I love the Egyptian line. I don't know why, I just like them even though I don't play any game at all that uses them.
 Of my custom pieces my favorite is the working Roman Treadmill crane I entered into HADD a few years ago. It was a lot of fun figuring out how to make it work.
[TP] Looking through your site it appears that all the pieces come unpainted? Are you planning on offering painted pieces? If not, why not?
[Itar] That's something I go back and forth with. I would love to sell pre-painted terrain but the amount of work to do one would be a major pain. I will probably do some pre-painted terrain at some point. I still have to figure out how to produce it in a mass production environment
[TP] Are your pieces all solid cast or glued from original bricks? If they are solid cast how did you go about creating the casts? What did you have to consider before making a cast?
 [Itar] All of my pieces are solid cast. I think I only have one that requires assembly by the customer. A lot of my pieces require 2 or 3 part molds to cast solid. To do so I have to consider how I'm going to get the resin into every part of the mold and be able to demold it easily. I also have to be able reliably produce the piece on a daily basis. If there's any problem spot that tends to collect bubbles then it doesn't make it into the store. I usually make a mold of a single piece and cast that a few times to make sure it'll work before making mass production molds.
[TP] I am curious how you do a 3 piece mold? Never heard of doing that only a 2 piece molds.
 [Itar] Here's an example of a 3 part mold. This one casts the Egyptian Pylon as a single piece that is hollow inside and about 1/8" thick. To make the mold I had to glue the master pylon down and cover half of the piece with clay and pour silicone. Then take away the clay and pour the second part of the mold. Once that is done I rolled out clay to the desired thickness and put it inside the 2 parts of the mold and poured the last part of the mold. It's cast by filling the mold up to the required level and then placing the 3rd part inside (similar to the plate method of casting) and displacing the liquid resin until it slightly overflows
[TP] Any plans to offer sets of pieces that go together
[Itar] Nope. No plans to do sets at all. There's plenty of great people out there that do sets so I don't need to.
[TP] Are you seeing much of a profit in creating this terrain?
[Itar] The first couple years everything we made went back into the business. We're making a nice profit. Not enough to retire from my day job but enough to pay my gaming expenses and then some. It keeps growing so it'll get there eventually.
[TP] Which wargames do you play? Which one is your favorite?
[Itar] I have played Warhammer 40k, Flames of War, Battletech, and any number of RPG games. Right now I'm only playing Battletech on a regular basis. Battletech is probably my favorite game. I've been playing it since the late 80s and I've always really enjoyed it.
[TP] Any special terrain techniques you use when creating terrain?
[Itar] I use plaster pieces to sculpt masters. I use a wire brush against balsa wood to make a nice wood texture. Sometimes I just make it up as I go.
[TP] What is your favorite material to work with?
[Itar] I really don't have a single favorite material. I use all kinds of materials to make my pieces. I've used balsa wood, polymer clay, plaster, and once some paper towels I swiped from the bathroom at work (it had a great texture).
[TP] Tell me about a mistake you made in creating terrain and what you learned from it.
[Itar] When I first started I made this really large stepped pyramid model. It looked great but after I poured the silicone for the mold I realize it was just slightly too big to fit in my vacuum chamber. It made it difficult to make duplicate molds. In the end I just discontinued the piece and I'll have to remake it later. I learned to measure my mold boxes BEFORE I pour the silicone.
[TP] Any final advice or thoughts?
[Itar] Never pet a burning dog. All kidding aside. If you're going to start a business then be prepared to eat, sleep, and breathe terrain for the next few years. It's possible, but you're going to be working hard and you're not going to get rich. On the up side it can be really rewarding.
As a hobbyist. Always try something new with each project. It may not work, but you're bound to learn something from it
.jpg) [TP] How long have you been in business?
[TP] How long have you been in business?[Itar] We've been open since January 2009. So 3 years.
[TP] What do you use for the inspiration of your pieces?
[Itar] I find inspiration everywhere. If I'm doing a line of products, say torture equipment, I will Google whatever it is and use pictures of medieval torture equipment as a starting point. I've also stopped and looked at the building at my day job and thought "that would make a neat looking building in 6mm". Inspiration can strike anywhere, at any time.
[TP] What types of materials do you use for your pieces?
[Itar] I cast all my pieces in some sort of resin. I will occasionally use Hydrostone plaster for my personal custom pieces and for sculpting.
[TP] Are there any special suppliers you get your materials from? Any suppliers that have perticularly good service?
[Itar] I get a lot of my specialty resins from Smooth-on. I also get supplies from Sil-pak and Aeromarine Products.
[TP] What is your favorite terrain piece?
 [Itar] From the ones available on in my store I love the Egyptian line. I don't know why, I just like them even though I don't play any game at all that uses them.
  Of my custom pieces my favorite is the working Roman Treadmill crane I entered into HADD a few years ago. It was a lot of fun figuring out how to make it work.
[TP] Looking through your site it appears that all the pieces come unpainted? Are you planning on offering painted pieces? If not, why not?
[Itar] That's something I go back and forth with. I would love to sell pre-painted terrain but the amount of work to do one would be a major pain. I will probably do some pre-painted terrain at some point. I still have to figure out how to produce it in a mass production environment
[TP] Are your pieces all solid cast or glued from original bricks? If they are solid cast how did you go about creating the casts? What did you have to consider before making a cast?
 [Itar] All of my pieces are solid cast. I think I only have one that requires assembly by the customer. A lot of my pieces require 2 or 3 part molds to cast solid. To do so I have to consider how I'm going to get the resin into every part of the mold and be able to demold it easily. I also have to be able reliably produce the piece on a daily basis. If there's any problem spot that tends to collect bubbles then it doesn't make it into the store. I usually make a mold of a single piece and cast that a few times to make sure it'll work before making mass production molds.
 [TP] I am curious how you do a 3 piece mold? Never heard of doing that only a 2 piece molds.
 [Itar] Here's an example of a 3 part mold. This one casts the Egyptian Pylon as a single piece that is hollow inside and about 1/8" thick. To make the mold I had to glue the master pylon down and cover half of the piece with clay and pour silicone. Then take away the clay and pour the second part of the mold. Once that is done I rolled out clay to the desired thickness and put it inside the 2 parts of the mold and poured the last part of the mold. It's cast by filling the mold up to the required level and then placing the 3rd part inside (similar to the plate method of casting) and displacing the liquid resin until it slightly overflows
[TP] Any plans to offer sets of pieces that go together
[Itar] Nope. No plans to do sets at all. There's plenty of great people out there that do sets so I don't need to.
[TP] Are you seeing much of a profit in creating this terrain?
[Itar] The first couple years everything we made went back into the business. We're making a nice profit. Not enough to retire from my day job but enough to pay my gaming expenses and then some. It keeps growing so it'll get there eventually.
[TP] Which wargames do you play? Which one is your favorite?
[Itar] I have played Warhammer 40k, Flames of War, Battletech, and any number of RPG games. Right now I'm only playing Battletech on a regular basis. Battletech is probably my favorite game. I've been playing it since the late 80s and I've always really enjoyed it.
[TP] Any special terrain techniques you use when creating terrain?
[Itar] I use plaster pieces to sculpt masters. I use a wire brush against balsa wood to make a nice wood texture. Sometimes I just make it up as I go.
[TP] What is your favorite material to work with?
[Itar] I really don't have a single favorite material. I use all kinds of materials to make my pieces. I've used balsa wood, polymer clay, plaster, and once some paper towels I swiped from the bathroom at work (it had a great texture).
[TP] Tell me about a mistake you made in creating terrain and what you learned from it.
[Itar] When I first started I made this really large stepped pyramid model. It looked great but after I poured the silicone for the mold I realize it was just slightly too big to fit in my vacuum chamber. It made it difficult to make duplicate molds. In the end I just discontinued the piece and I'll have to remake it later. I learned to measure my mold boxes BEFORE I pour the silicone.
[TP] Any final advice or thoughts?
[Itar] Never pet a burning dog. All kidding aside. If you're going to start a business then be prepared to eat, sleep, and breathe terrain for the next few years. It's possible, but you're going to be working hard and you're not going to get rich. On the up side it can be really rewarding.
As a hobbyist. Always try something new with each project. It may not work, but you're bound to learn something from it
Thursday, May 24, 2012
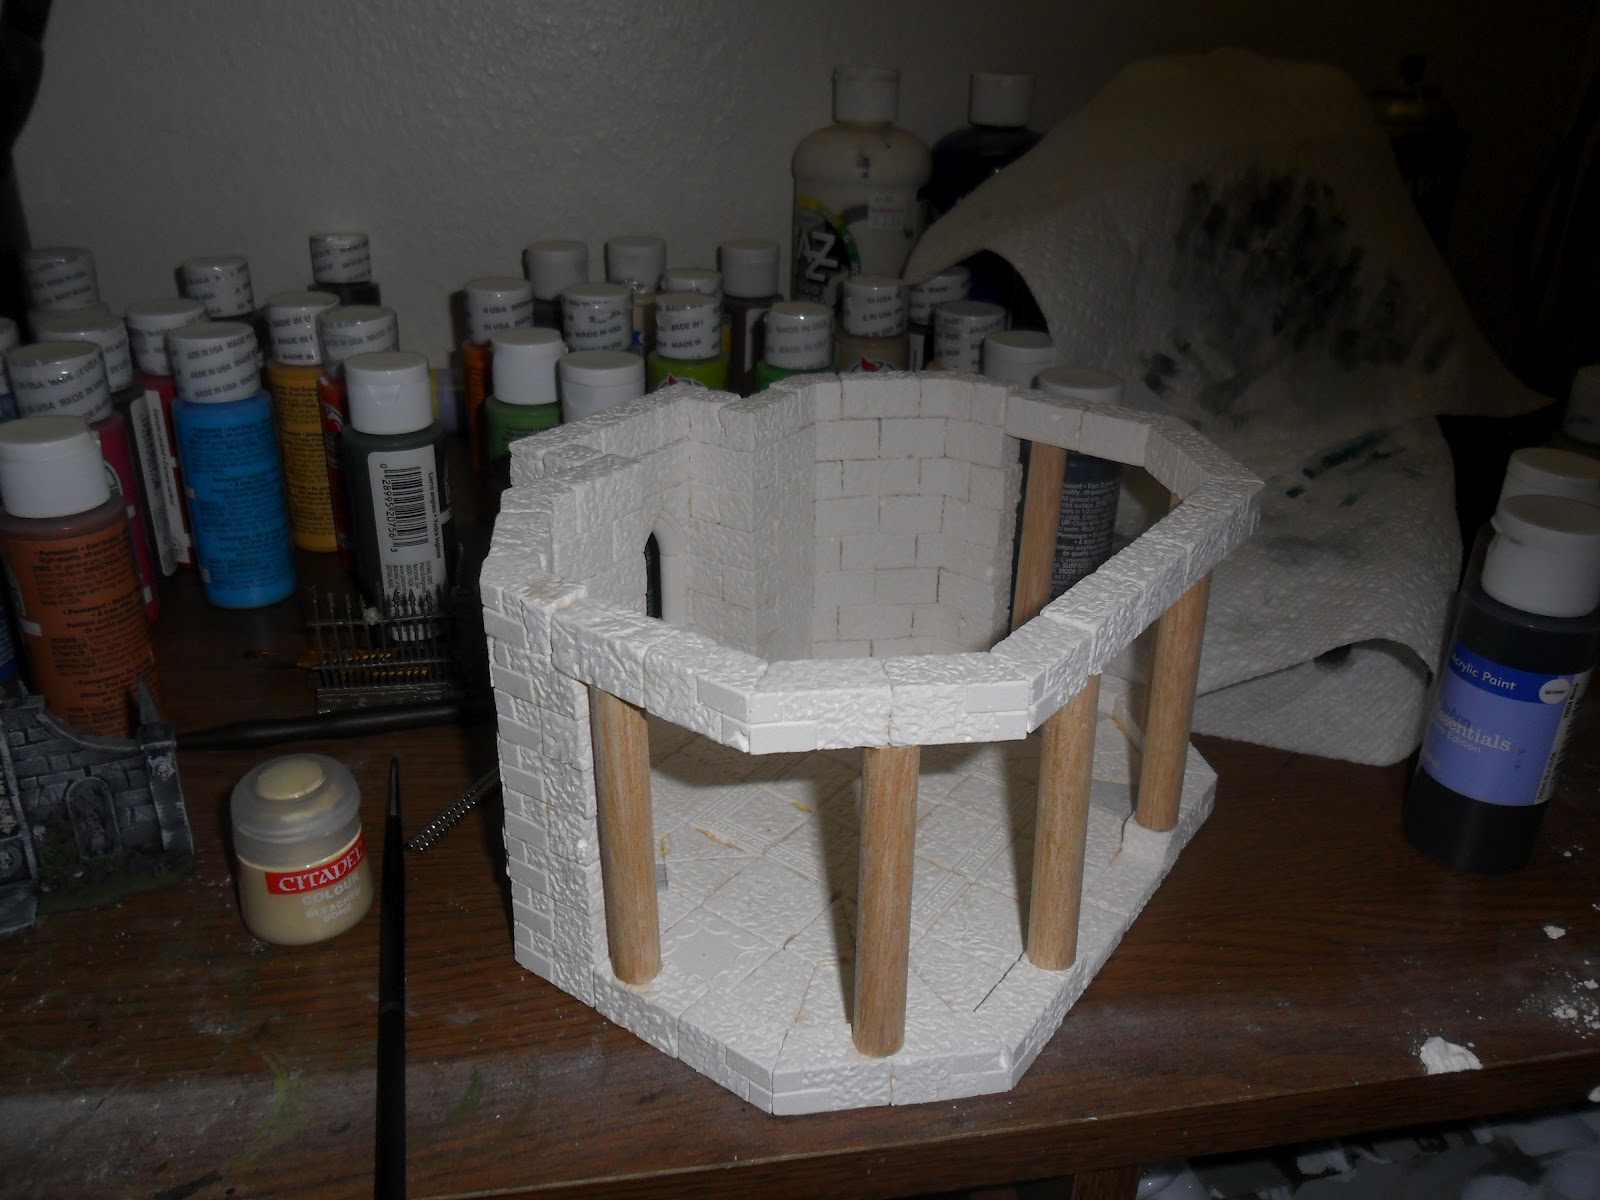
WIP: Temple of Aradoth update 2
Ok so I have finished the main temple. I might decide to put a roof on it but right now I like it open aired. I ran into some issue putting in the pillars and getting everything to line up the way I wanted. I tried dry building the pillar section upside down first and then putting all the pillars on at once but it didn't quite line up right. That's ok though, I am not concerned about high quality right now and mostly about getting designs completed and learning from the construction.
The piece is still going to look amazing once painted and placed on the base with the bridge. Here are some pics!


The piece is still going to look amazing once painted and placed on the base with the bridge. Here are some pics!


Wednesday, May 23, 2012
Cryx vs khador battle 2
So time for a rematch!!! After I beat him so bad he just had to come back for more. We played with the same army lists and the same terrain layout as before. You can check out those results here: http://terrainproject.blogspot.com/2012/05/cryx-dominate-khador.html
 I setup first and went first. I decided to setup on the same side of the board as I did last time. I again put the slayer on the left flank but also put one of the deathrippers there as well. For my first round I allocated 1 focus to each of my units and ran them all. I moved the slayer and death ripper up the left flank again and took Denegrah, the defiler and another deathripper up the middle. I have the defiler covering my far right flank.
Khador moves up the middle but no one is in range for any assualts to take place.
 For my second round I move denegrah into the ruined left tower to give her cover and allow me to cast her spells through the arcnodes. I also advance the defiler and deathripper up the middle to move to intercept his heavy jacks. The slayer and other deathripper move up the left. I also manage to put a parasite and corrosion counter on one of his Warjacks. But deal no damage.

Khador for his second turn moves up and assaults my right deathripper nearly destroying it. He imobilized it and made it so it could no longer function as an arcnode.
 Now it is time for my revenge though!!! I use 1 focus to upkeep the parasite and allocate 3 focus to the slayer. I activate Denegrah first and use her feat of the withering which drops all enemy stats within 8" down by 2. This hits both jacks and the Khaldun Lord. I also use the left deathripper to put a parasite on his left jack. Next I activate my Slayer and do just that!!! After reading the rules again I can use a special attack and normal attacks. Since there defense is now 8 I automatically hit them so we skip those rolls for this round. I use my Combo Strike and boost the damage, followed by a boosted right arm and left arm assault. With the reduced armor on the jack to 20 this deals enough damage to destroy the jack. I follow this up with an assualt by both death rippers on his remaining jack but only manage to do 6 or 8 damage. I advance the defiler up to the fence line and take a pot shot at his wardog but fail to hit (It was not affected by the withering)
Khador advances his Warcaster and Dog and does a blast attack that hits both deathrippers. The one on the left takes a massive amount of damage and is imobolized and only has his head active. The other one takes a moderate amount of damage and is also barely hanging on.
 Time for me to have some fun though. I allocate 3 focus to the slayer and 3 focus to the right deathripper. The other focus I spend to upkeep the parasite on his remaining jack. I first activate one of the deathrippers and deal no damage against his heavy jack. The other deathripper hits with his first strike and I boost the damage, because the first strike hit I spend another focus and his second strike automatically hits which I also boost the damage on. This leaves him with about 6 points left. So I assualt both the jack and the Khaldun Lord from behind with the slayer. I use one of my power fists and hit the jack and boost the damage enough to kill him. I then focus the slayers attention on the Khaldun Lord and use his combo strike with a boosted attack and boosted damage to finish him off.
With devastation all around and no Jacks down Khador decides to flee and I chase him down with my slayer and defiler to get the killing shots.
Khador moves up the middle but no one is in range for any assualts to take place.
For my second round I move denegrah into the ruined left tower to give her cover and allow me to cast her spells through the arcnodes. I also advance the defiler and deathripper up the middle to move to intercept his heavy jacks. The slayer and other deathripper move up the left. I also manage to put a parasite and corrosion counter on one of his Warjacks. But deal no damage.Khador for his second turn moves up and assaults my right deathripper nearly destroying it. He imobilized it and made it so it could no longer function as an arcnode.
Now it is time for my revenge though!!! I use 1 focus to upkeep the parasite and allocate 3 focus to the slayer. I activate Denegrah first and use her feat of the withering which drops all enemy stats within 8" down by 2. This hits both jacks and the Khaldun Lord. I also use the left deathripper to put a parasite on his left jack. Next I activate my Slayer and do just that!!! After reading the rules again I can use a special attack and normal attacks. Since there defense is now 8 I automatically hit them so we skip those rolls for this round. I use my Combo Strike and boost the damage, followed by a boosted right arm and left arm assault. With the reduced armor on the jack to 20 this deals enough damage to destroy the jack. I follow this up with an assualt by both death rippers on his remaining jack but only manage to do 6 or 8 damage. I advance the defiler up to the fence line and take a pot shot at his wardog but fail to hit (It was not affected by the withering)Khador advances his Warcaster and Dog and does a blast attack that hits both deathrippers. The one on the left takes a massive amount of damage and is imobolized and only has his head active. The other one takes a moderate amount of damage and is also barely hanging on.
With devastation all around and no Jacks down Khador decides to flee and I chase him down with my slayer and defiler to get the killing shots.
Monday, May 21, 2012
Weekend update
Didn't have a lot of time to work on terrain this weekend. However I did get some work done. I finished the floor for the temple piece, began building a 3" gazebo piece, did some more organizing in the shop.
This week I want to finish the gardens of morr and the gazebo. The temple can wait till next week.
At some point I will need to clear enough space to start work on minis tirith. I am almost ready to start on some of the smaller buildings like the temple on the back side.
This week I want to finish the gardens of morr and the gazebo. The temple can wait till next week.
At some point I will need to clear enough space to start work on minis tirith. I am almost ready to start on some of the smaller buildings like the temple on the back side.
Friday, May 18, 2012
Cryx dominate khador
This was both of our first time playing so there was a lot of learning going on. In the end though my cryx army suffered no losses and barely any damage.
I was playing with the cryx battle box set which includes denegrah, 2 deathrippers, slayer, and defiler.
 The first turn was uneventful. We both decided to run our units. He basically advanced straight forward while I decided to take the slayer to my left side of the battlefield and have denehgra and the rest of the smaller jacks move up the center. Round 2 is where the action began. I moved my units up behind the ruined pillars which were difficult terrain. The only thing those units did was denegrah managed to get a corrosion counter on his devastator. The slayer however was able to charge up and deal a massive amount of damage using his special attack. This disable one of the other devastators arms and inflicted additional damage to the jack. Below is a picture of the field after my 2nd turn (before khadors second turn) had ended.

 Since he planted a devastator in the middle of the ruined castle I determined that I would not be able to inflict much if any damage to it with the units I had available. It would require me to roll incredibly high on the damage since it has a defense of 25. So instead of attempting to engage I ran denegrah and the rest of the units away. The slayer did another massive attack against the devastator and destroyed a second arm.


I was playing with the cryx battle box set which includes denegrah, 2 deathrippers, slayer, and defiler.
Khador fielded: the Butcher of Khardov, War Dog, 2 Devastators, and Koldun Lord. Below is a picture of the inital deployment and terrain setup.
The first turn was uneventful. We both decided to run our units. He basically advanced straight forward while I decided to take the slayer to my left side of the battlefield and have denehgra and the rest of the smaller jacks move up the center. Round 2 is where the action began. I moved my units up behind the ruined pillars which were difficult terrain. The only thing those units did was denegrah managed to get a corrosion counter on his devastator. The slayer however was able to charge up and deal a massive amount of damage using his special attack. This disable one of the other devastators arms and inflicted additional damage to the jack. Below is a picture of the field after my 2nd turn (before khadors second turn) had ended.
Khador finished his second turn by advancing up the middle where my warcaster was and attempting to deal some damage with his ranged attacks. Because the speed of his units and the difficult terrain he was unable to get into melee combat. All of his attacks failed to hit though.
Since he planted a devastator in the middle of the ruined castle I determined that I would not be able to inflict much if any damage to it with the units I had available. It would require me to roll incredibly high on the damage since it has a defense of 25. So instead of attempting to engage I ran denegrah and the rest of the units away. The slayer did another massive attack against the devastator and destroyed a second arm.
He moved his units around and focused some attacks on my slayer. He managed to deal 5 damage to it (some bad rolls) but it failed to cripple any part of the jack. My 4th turn starts and I allocated 1 focus to one of the deathripper. My slayer starts combat by destroying the Devastator jack. I then run the deathripper up the side almost as far as I can to act as an arc node. I also move denagrah and my other death ripper and the defiler up the side but only 5-7 inches a piece. This allowed me to use denegrahs spells from relative safety. Using the deathripper as an arcnode I was able to Koldun Lord with venom and put a corrosion counter on the devastator. I also put a parasite on his devastator reducing his armor by 3.
I then run the deathripper up the side almost as far as I can to act as an arc node. I also move denagrah and my other death ripper and the defiler up the side but only 5-7 inches a piece. This allowed me to use denegrahs spells from relative safety. Using the deathripper as an arcnode I was able to Koldun Lord with venom and put a corrosion counter on the devastator. I also put a parasite on his devastator reducing his armor by 3.
Khadors 4th turn he engages the deathripper with his wardog and manages to do a bit more damage with the butcher against my slayer but again not enough to disable anything. I continue to advance the second deathripper up the side and the defiler. When the defiler moved within 6" of his wardog he decided to charge it eliminating that ranged attack from being used. I then advanced the slayer into the second devastator and rip one of its arms off. Finally denegrah casts a parasite through the deathripper arcnode that is now no longer in combat and hits the butcher reducing his armor by 3. Khador had moved the wardog out of range of an ability he could of used to prevent me from targeting the butcher. I then cast venom through the deathripper and managed to kill his warcaster.
I don't have any pictures of the final battle scene but below is one I took of his devastator blocking the path through the rubble!
This was also the first battle with Castle Gate terrain piece and it looked awesome on the field!!!
This was also the first battle with Castle Gate terrain piece and it looked awesome on the field!!!
Interview: Mike from TerranScapes
In todays interview I talk with Mike from TerranScapes. He has a great set of terrain pieces and boards and does a lot of custom work. You can find his work on his site at http://www.terranscapes.com/
[TP] How long ago did you create Terranscapes? Did it start out as a hobby?
[Mike] I started TerranScapes about 5 years ago after I left teaching (middle school science) as a career. I had been running an after school club for Warhammer (40k and Fantasy) for a few years based on student request. When I determined that teaching wasn't for me, I still had several pieces of terrain that I had built for the club. I decided to sell them on eBay and discovered that others were creating terrain for sale as a business. Since I had an opportunity to try something new for work, I decided to try out terrain for a year and see how it went. Haven't looked back since.
[TP] From your videos on youtube it looks like you have quite the setup in your shop. How much space do you actually have? Any perticular part of the workspace you use the most?
[Mike] My work space is actually very small. I converted part of my basement into a workshop adding two large workbenches, a painting hood and squeezed in as much shelving as I could manage. Total area for the shop is a little over 400 sq. ft. so its pretty cramped most of the time. I'd say the most used piece of equipment is the painting hood that vents outside. Without that, I'd be swamped in spray paint fumes and plaster dust.
[TP] It seems that you manage to keep your hours fully booked out pretty easily. How many projects does it take to fill up your time for the month?
[Mike] The amount of work I complete in a month varies depending on the type of pieces I am working on. No matter how much I do though, it doesn't keep up with demand. Last year I got a bit more popular and demand has since far outstripped my ability to fill it. As a result I now shut down the store for a few months to allow me to fill orders that come in. I would say I am able to fill 3-4 orders in a month depending on their size.
[TP] Are you doing this work full time or do you have a side gig?
[Mike] TerranScapes is a full time job for me and I work hard to maintain a 40 hour week. Working at home means that those hours get squeezed in where I can *looking at the clock -> 8:30 p.m.*
[TP] Do you have any employees other than yourself?
[Mike] Currently I don't have any employees but I am investigating some options at the moment. I'm very focused on quality so having someone else working on projects makes me nervous. In addition, to be fair, I'm not sure I can afford to pay an employee a living wage (see #6) and I don't believe in being exploitative for profit. Saying all of that, I actually enjoy working alone so that has also been a deterrent to adding employees.
[TP] Are you able to realize much profit in making Terrain?
[Mike] TerranScapes does turn a profit, though its quite modest. Terrain making is a very labor intensive business, and requires somewhere around 50% of my time doing things to support the business that don't directly create a product. Web site maintenance, photography, videos, email, shipping, ordering, researching, experimenting, etc. are big competing time investments.
[TP] What is your personal favorite piece and why?
[Mike] Its hard to have favorites as I really enjoy the variety of the job. If I had to pick, I might pick the Crypt Entrances I did about a year ago. I felt they melded playability with great looks, with the added bonus of being gothic horror. I love the undead. :)
[TP] What piece do you get the most requests for?
[Mike] Modular board sets are probably the most requested orders. I've been very pleased with how they have evolved over the years and I'm constantly looking to add to and improve them.
[TP] You do a lot of custom designs using hirst arts blocks. How do you protect the IP for these pieces?
[Mike] Well, I hadn't considered that unique designs were an IP issue. After your last interview however, I reviewed the contract and I can see a paragraph that could be interpreted as the rights going to Bruce Hirst. *shrug* To be honest, I'm not a big fan of the concept of IP and if Bruce gets concerned I would be happy to go with what ever the contract stipulates. We have a good working relationship and my designs don't generate enough profits to be a big concern for either of us I imagine.
Note: The interview referenced above is the one I did with Ian here: http://terrainproject.blogspot.com/2012/05/interview-ian-from-griffin-grove-gaming.html
[TP] Tell me about one of your most memorable "doh" moments when you messed something up beyond repair.
[Mike] I was trying to do a new style of mold pouring called cavity mold pouring. You build a shell around the master and then pour the rubber into the shell to fill the space between the shell and the master. I skipped the important step of screwing the shell to the table (who knew hot glue wasn't enough) and as the shell filled, the buoyancy of the rubber lifted it off the table with a resulting mass flow of silicone spilling everywhere. :) Gotta learn somehow.
[TP] How long does it take you to put together a video for youtube? What is your inspiration for the videos?
[Mike] The videos are much more time consuming than I think people realize. I work hard to try to put up polished videos and for a 15 minute video, it might take me 2+ hours from set up of lights to starting the upload. Its the main reason I don't do tutorial videos. I just can't spare the time to do them the way I want to. As for inspiration, I just try to put up the kind of videos I want to see: good close ups, not a lot of repetition, clear descriptions, and a willingness to be humble and receive feedback and suggestions. I'm always looking to make them better and I am probably my own harshest critic.
[TP] Any short cuts that you have learned to help in casting or making terrain?
[Mike] I still feel like a newbie when it comes to mold making and casting, though I have learned a lot. I think the best tip would be knowing several casting materials and mold making methods. The right selections for a project makes a world of difference. Getting locked in to one type of plastic/foam or one type of molding will reduce your quality and creative potential.
[TP] Any closing thoughts or advice you would give someone just starting out?
[Mike] I get a lot of inquiries from people interested in starting up their own terrain business. In general I would say that being a sole proprietor of a terrain business requires a really wide variety of skills (see #6). While its rewarding, its not for everyone. A small business can be very hard to manage and may not make a lot of money. You need to love the work, love learning, and be willing to put in a lot of hours. A little discipline, organization and self motivation doesn't hurt either. ;)
Wednesday, May 16, 2012
Monday, May 14, 2012
Subscribe to:
Posts (Atom)