I haven't had a lot of time to work on things this past week. Life has just been way too busy. I did however eek out a little bit of time yesterday to fix/finish off the vibration table. I used some foam and springs to dampen the vibration and things seem to work wonderfully now! I'll have some pictures up soon as well as brief how-to.
I have also switched over to the glass method of scraping the tiles and let me tell you it makes a WORLD of difference. I found some already cut acrylic sheets at lowes for about $3 each that are just the right size for a mold. I picked up 5 of them and plan on getting about 10 more tonight!
I am also now doing a syrenge method instead of pouring from the sides. I bought a bottle that I can squeeze the plaster out of to do this, it isn't an actual syrenge. I plan on going to the restraunt supply store soon and picking up a few more bottles of different sizes depending how much plaster I am working with.
Also I have found that going with a 2 to 1 ratio of plaster to water by volume seems to work out fairly well for overall strength. Now to get to casting a bunch more bricks!!!
Ohh on another note my adsense account was disable because of invalid clicks! Not sure what that is about or how they determine that but I have now switched ad providers and will be looking at finding better ad networks for this blog in the future!
Showing posts with label terrain. Show all posts
Showing posts with label terrain. Show all posts
Monday, June 4, 2012
Friday, May 25, 2012
Interview: Itar from Itar's Workshop
This week I talk with Itar from Itars Workshop: http://www.itarsworkshop.com/catalog/index.php. He has some pretty cool and pieces for very reasonable prices. If you need to fill in some gaps in your terrain or don't have much of a budget to buy a large set of pieces all at once he is definately your guy!!! He has also given some helpful insite to the world of terrain manufacture.
.jpg) [TP] How long have you been in business?
[TP] How long have you been in business?
[Itar] We've been open since January 2009. So 3 years.
[TP] What do you use for the inspiration of your pieces?
[Itar] I find inspiration everywhere. If I'm doing a line of products, say torture equipment, I will Google whatever it is and use pictures of medieval torture equipment as a starting point. I've also stopped and looked at the building at my day job and thought "that would make a neat looking building in 6mm". Inspiration can strike anywhere, at any time.
[TP] What types of materials do you use for your pieces?
[Itar] I cast all my pieces in some sort of resin. I will occasionally use Hydrostone plaster for my personal custom pieces and for sculpting.
[TP] Are there any special suppliers you get your materials from? Any suppliers that have perticularly good service?
[Itar] I get a lot of my specialty resins from Smooth-on. I also get supplies from Sil-pak and Aeromarine Products.
[TP] What is your favorite terrain piece?
 [Itar] From the ones available on in my store I love the Egyptian line. I don't know why, I just like them even though I don't play any game at all that uses them.
 Of my custom pieces my favorite is the working Roman Treadmill crane I entered into HADD a few years ago. It was a lot of fun figuring out how to make it work.
[TP] Looking through your site it appears that all the pieces come unpainted? Are you planning on offering painted pieces? If not, why not?
[Itar] That's something I go back and forth with. I would love to sell pre-painted terrain but the amount of work to do one would be a major pain. I will probably do some pre-painted terrain at some point. I still have to figure out how to produce it in a mass production environment
[TP] Are your pieces all solid cast or glued from original bricks? If they are solid cast how did you go about creating the casts? What did you have to consider before making a cast?
 [Itar] All of my pieces are solid cast. I think I only have one that requires assembly by the customer. A lot of my pieces require 2 or 3 part molds to cast solid. To do so I have to consider how I'm going to get the resin into every part of the mold and be able to demold it easily. I also have to be able reliably produce the piece on a daily basis. If there's any problem spot that tends to collect bubbles then it doesn't make it into the store. I usually make a mold of a single piece and cast that a few times to make sure it'll work before making mass production molds.
[TP] I am curious how you do a 3 piece mold? Never heard of doing that only a 2 piece molds.
 [Itar] Here's an example of a 3 part mold. This one casts the Egyptian Pylon as a single piece that is hollow inside and about 1/8" thick. To make the mold I had to glue the master pylon down and cover half of the piece with clay and pour silicone. Then take away the clay and pour the second part of the mold. Once that is done I rolled out clay to the desired thickness and put it inside the 2 parts of the mold and poured the last part of the mold. It's cast by filling the mold up to the required level and then placing the 3rd part inside (similar to the plate method of casting) and displacing the liquid resin until it slightly overflows
[TP] Any plans to offer sets of pieces that go together
[Itar] Nope. No plans to do sets at all. There's plenty of great people out there that do sets so I don't need to.
[TP] Are you seeing much of a profit in creating this terrain?
[Itar] The first couple years everything we made went back into the business. We're making a nice profit. Not enough to retire from my day job but enough to pay my gaming expenses and then some. It keeps growing so it'll get there eventually.
[TP] Which wargames do you play? Which one is your favorite?
[Itar] I have played Warhammer 40k, Flames of War, Battletech, and any number of RPG games. Right now I'm only playing Battletech on a regular basis. Battletech is probably my favorite game. I've been playing it since the late 80s and I've always really enjoyed it.
[TP] Any special terrain techniques you use when creating terrain?
[Itar] I use plaster pieces to sculpt masters. I use a wire brush against balsa wood to make a nice wood texture. Sometimes I just make it up as I go.
[TP] What is your favorite material to work with?
[Itar] I really don't have a single favorite material. I use all kinds of materials to make my pieces. I've used balsa wood, polymer clay, plaster, and once some paper towels I swiped from the bathroom at work (it had a great texture).
[TP] Tell me about a mistake you made in creating terrain and what you learned from it.
[Itar] When I first started I made this really large stepped pyramid model. It looked great but after I poured the silicone for the mold I realize it was just slightly too big to fit in my vacuum chamber. It made it difficult to make duplicate molds. In the end I just discontinued the piece and I'll have to remake it later. I learned to measure my mold boxes BEFORE I pour the silicone.
[TP] Any final advice or thoughts?
[Itar] Never pet a burning dog. All kidding aside. If you're going to start a business then be prepared to eat, sleep, and breathe terrain for the next few years. It's possible, but you're going to be working hard and you're not going to get rich. On the up side it can be really rewarding.
As a hobbyist. Always try something new with each project. It may not work, but you're bound to learn something from it
.jpg) [TP] How long have you been in business?
[TP] How long have you been in business?[Itar] We've been open since January 2009. So 3 years.
[TP] What do you use for the inspiration of your pieces?
[Itar] I find inspiration everywhere. If I'm doing a line of products, say torture equipment, I will Google whatever it is and use pictures of medieval torture equipment as a starting point. I've also stopped and looked at the building at my day job and thought "that would make a neat looking building in 6mm". Inspiration can strike anywhere, at any time.
[TP] What types of materials do you use for your pieces?
[Itar] I cast all my pieces in some sort of resin. I will occasionally use Hydrostone plaster for my personal custom pieces and for sculpting.
[TP] Are there any special suppliers you get your materials from? Any suppliers that have perticularly good service?
[Itar] I get a lot of my specialty resins from Smooth-on. I also get supplies from Sil-pak and Aeromarine Products.
[TP] What is your favorite terrain piece?
 [Itar] From the ones available on in my store I love the Egyptian line. I don't know why, I just like them even though I don't play any game at all that uses them.
  Of my custom pieces my favorite is the working Roman Treadmill crane I entered into HADD a few years ago. It was a lot of fun figuring out how to make it work.
[TP] Looking through your site it appears that all the pieces come unpainted? Are you planning on offering painted pieces? If not, why not?
[Itar] That's something I go back and forth with. I would love to sell pre-painted terrain but the amount of work to do one would be a major pain. I will probably do some pre-painted terrain at some point. I still have to figure out how to produce it in a mass production environment
[TP] Are your pieces all solid cast or glued from original bricks? If they are solid cast how did you go about creating the casts? What did you have to consider before making a cast?
 [Itar] All of my pieces are solid cast. I think I only have one that requires assembly by the customer. A lot of my pieces require 2 or 3 part molds to cast solid. To do so I have to consider how I'm going to get the resin into every part of the mold and be able to demold it easily. I also have to be able reliably produce the piece on a daily basis. If there's any problem spot that tends to collect bubbles then it doesn't make it into the store. I usually make a mold of a single piece and cast that a few times to make sure it'll work before making mass production molds.
 [TP] I am curious how you do a 3 piece mold? Never heard of doing that only a 2 piece molds.
 [Itar] Here's an example of a 3 part mold. This one casts the Egyptian Pylon as a single piece that is hollow inside and about 1/8" thick. To make the mold I had to glue the master pylon down and cover half of the piece with clay and pour silicone. Then take away the clay and pour the second part of the mold. Once that is done I rolled out clay to the desired thickness and put it inside the 2 parts of the mold and poured the last part of the mold. It's cast by filling the mold up to the required level and then placing the 3rd part inside (similar to the plate method of casting) and displacing the liquid resin until it slightly overflows
[TP] Any plans to offer sets of pieces that go together
[Itar] Nope. No plans to do sets at all. There's plenty of great people out there that do sets so I don't need to.
[TP] Are you seeing much of a profit in creating this terrain?
[Itar] The first couple years everything we made went back into the business. We're making a nice profit. Not enough to retire from my day job but enough to pay my gaming expenses and then some. It keeps growing so it'll get there eventually.
[TP] Which wargames do you play? Which one is your favorite?
[Itar] I have played Warhammer 40k, Flames of War, Battletech, and any number of RPG games. Right now I'm only playing Battletech on a regular basis. Battletech is probably my favorite game. I've been playing it since the late 80s and I've always really enjoyed it.
[TP] Any special terrain techniques you use when creating terrain?
[Itar] I use plaster pieces to sculpt masters. I use a wire brush against balsa wood to make a nice wood texture. Sometimes I just make it up as I go.
[TP] What is your favorite material to work with?
[Itar] I really don't have a single favorite material. I use all kinds of materials to make my pieces. I've used balsa wood, polymer clay, plaster, and once some paper towels I swiped from the bathroom at work (it had a great texture).
[TP] Tell me about a mistake you made in creating terrain and what you learned from it.
[Itar] When I first started I made this really large stepped pyramid model. It looked great but after I poured the silicone for the mold I realize it was just slightly too big to fit in my vacuum chamber. It made it difficult to make duplicate molds. In the end I just discontinued the piece and I'll have to remake it later. I learned to measure my mold boxes BEFORE I pour the silicone.
[TP] Any final advice or thoughts?
[Itar] Never pet a burning dog. All kidding aside. If you're going to start a business then be prepared to eat, sleep, and breathe terrain for the next few years. It's possible, but you're going to be working hard and you're not going to get rich. On the up side it can be really rewarding.
As a hobbyist. Always try something new with each project. It may not work, but you're bound to learn something from it
Thursday, May 24, 2012
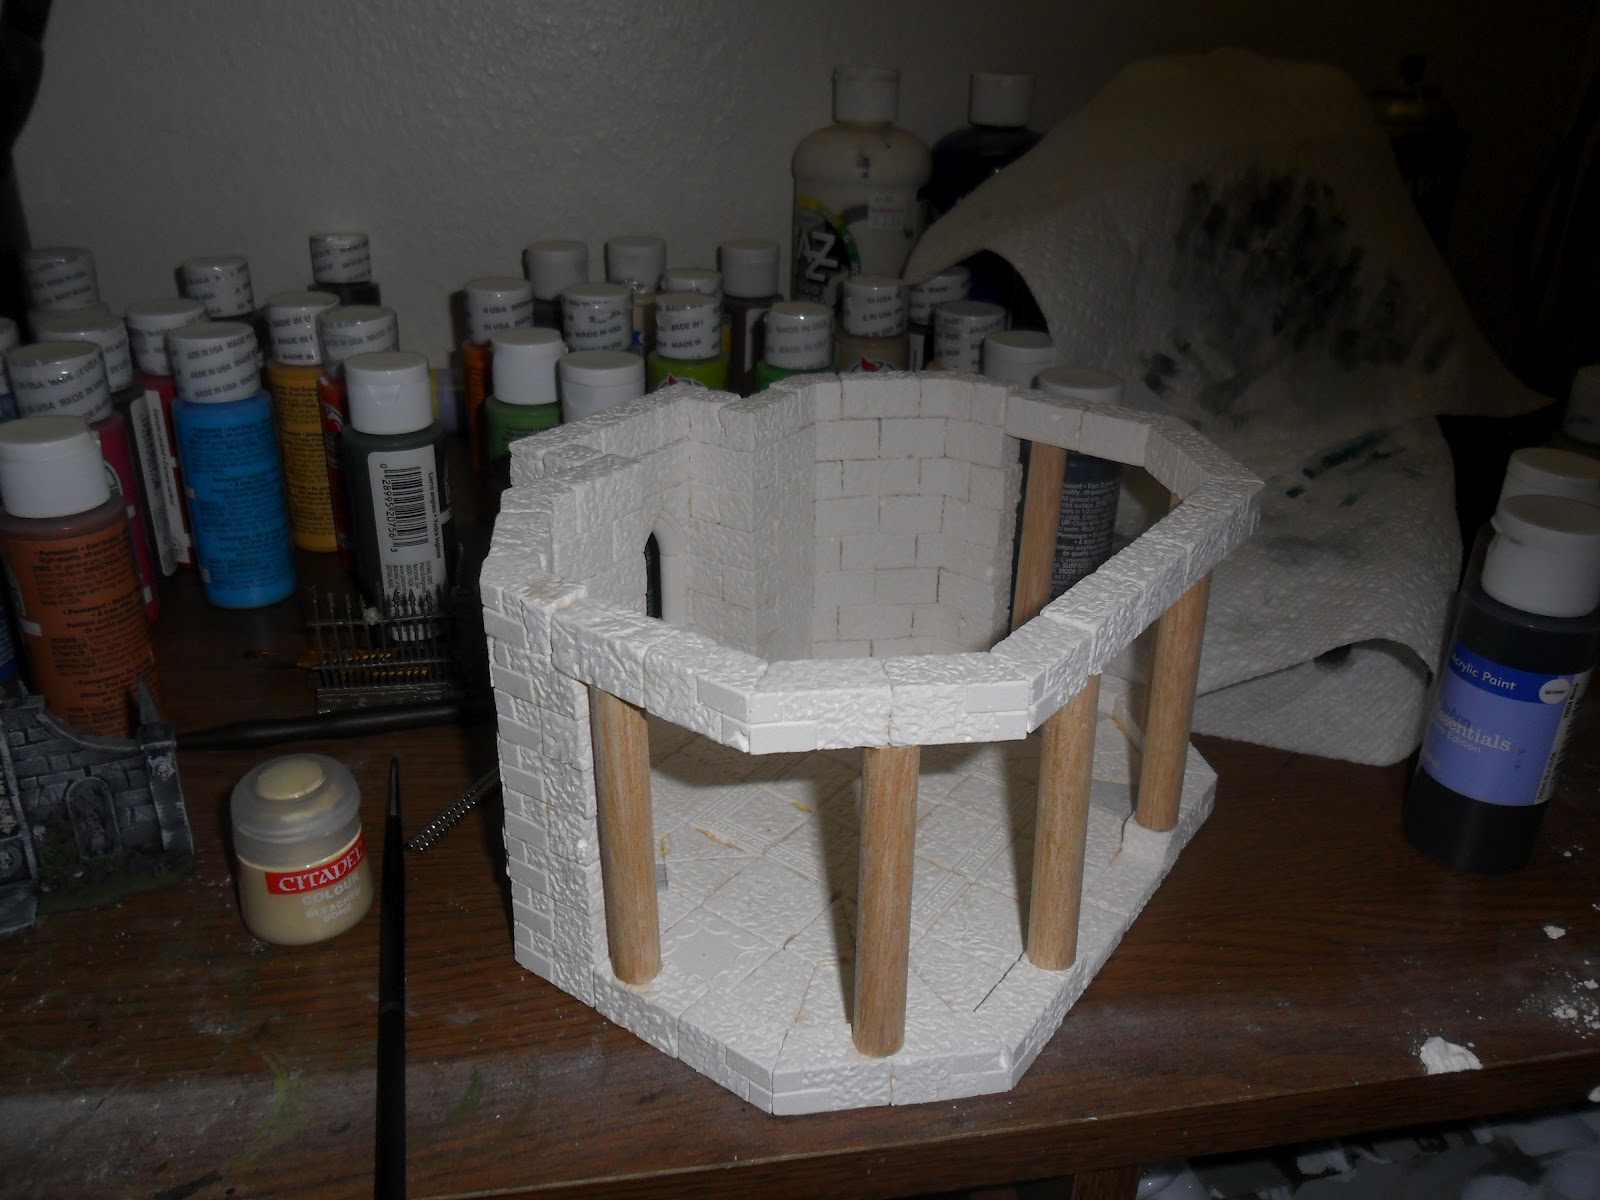
WIP: Temple of Aradoth update 2
Ok so I have finished the main temple. I might decide to put a roof on it but right now I like it open aired. I ran into some issue putting in the pillars and getting everything to line up the way I wanted. I tried dry building the pillar section upside down first and then putting all the pillars on at once but it didn't quite line up right. That's ok though, I am not concerned about high quality right now and mostly about getting designs completed and learning from the construction.
The piece is still going to look amazing once painted and placed on the base with the bridge. Here are some pics!


The piece is still going to look amazing once painted and placed on the base with the bridge. Here are some pics!


Monday, May 21, 2012
Weekend update
Didn't have a lot of time to work on terrain this weekend. However I did get some work done. I finished the floor for the temple piece, began building a 3" gazebo piece, did some more organizing in the shop.
This week I want to finish the gardens of morr and the gazebo. The temple can wait till next week.
At some point I will need to clear enough space to start work on minis tirith. I am almost ready to start on some of the smaller buildings like the temple on the back side.
This week I want to finish the gardens of morr and the gazebo. The temple can wait till next week.
At some point I will need to clear enough space to start work on minis tirith. I am almost ready to start on some of the smaller buildings like the temple on the back side.
Saturday, May 12, 2012
WIP: Temple of Aradoth
Nestled high in the great mountains, the temples only access point is a bridge across a canyon. Before you can get to the bridge you must first climb the winding road... A treacherous pass prone to falling rocks.
Below is a picture of the floor foot print. I am using my new octagon tower layout as the inspiration. Also using a road I was on the other day for the inspiration for the treacherous pass!

Below is a picture of the floor foot print. I am using my new octagon tower layout as the inspiration. Also using a road I was on the other day for the inspiration for the treacherous pass!
Friday, May 11, 2012
Complete: Castle Gate
I had an itch that I just had to scratch so I went and finished the castle gate. I dry brushed on a couple coats of lighter gray did some flocking and added some trees and voala it is done! Here are some pictures for your viewing pleasure.


The camera is definately good at showing those tiny spots I missed... Must be the flash lol. Might do some touch ups but I think this is pretty good for the first model with hirst arts bricks!
Thursday, May 10, 2012
WIP: Ruined Castle Gate Update 6
So I borrowed an air compressor so I could get some air brushing done. I did 2 coats one of the base black and one of the first color I would normally dry brush on. I cranked the air pressure down a bit and reduced the flow out of the pot so that it would stay mostly on the higher parts.
Here are some pictures!


Here are some pictures!


Large Octagon Tower
Someone asked how you could expand the octagon tower to add 2 inches to each side. Many solutions were proposed. I thought that you should be able to do it and maintain the original octagon pattern in the middle without cutting any bricks. However after much experimentation I could not find a pattern to do this... I did however come up with an entirely different solution.

This allows you to enlarge 4 of the sides to whatever size you want without having to entirely redo the pattern however you keep 4 of the sides the original pattern. I kind of like the footprint of this and might use it for a temple of some sort.

This allows you to enlarge 4 of the sides to whatever size you want without having to entirely redo the pattern however you keep 4 of the sides the original pattern. I kind of like the footprint of this and might use it for a temple of some sort.
Wednesday, May 9, 2012
WIP: Castle Gate Update 5
Ok so last night I had some time to take my gentle persuader (a.k.a hammer) and ruin up the gate piece I was working on. I made the decision to do this because the piece was just not going the way I wanted. I think I might of tried constructing something a little too big first!!! At an rate I ruined it up and put some rubble around the base and added a broken stair case. Check out the pictures below.


Monday, May 7, 2012
6 inch tower dome
Here is a picture of my first attempt at making a domed roof for the 6" tower or other applications. It is made from plaster and styrofoam and some cardboard. Working on a couple techniques for making it but I thought the first shot came out pretty good.


WIP: Castle Gate Update 4
Ok, so here are some more pictures of the castle gate I am working on. Unfortunately I have run into some issue durring the construction with keeping things straight. So at this point I am going to just break the piece up and turn it into a ruined castle gate. I have some better jigs I am putting together as well as some clamps and framing blocks which will help keep the blocks square in the future. I also will have more then one construction going on at a time which will allow me to take my time on each one and allow glue to dry.


Thursday, May 3, 2012
Gardens of morr: statue
Finished painting the statue from the garden set last night. Here is a picture for your viewing pleasure.

Wednesday, May 2, 2012
Wip: castle gate update 3
I have the first part of the bridge house done. Working on the second level of the towers. Work is slow but steady. I will have some other small pieces done here soon as well.

Gardens of morr: tomb
I finished painting one of the tombs from the gardens of morr set. Below are some pictures of the work. Pretty pleased with the piece.


Monday, April 30, 2012
New Molds OTW
So I decided to buy some new molds. I am still working on the gate project (I will post an update on that later tonight) but I also have a couple other smaller projects comming up to work on. I went with 5 molds this time to get the 10% discount. Here is what I bought:
#53 Travelers Bridge Mold
#60 Prison Tower Mold
#54 Gothic Church Mold
#200 Wall Builder
#61 Turret Mold
Hope they get here this weekend!
#53 Travelers Bridge Mold
#60 Prison Tower Mold
#54 Gothic Church Mold
#200 Wall Builder
#61 Turret Mold
Hope they get here this weekend!
Friday, April 27, 2012
Interview: Patrick from Advanced Terrain
For my first interview I talked with Patrick. He is the owner operator of http://www.advancedterrain.com/ which is making highly durable terrain pieces based off of Hirst Arts molds.
[TP]: What inspired you to create a business building wargame terrain?
[Patrick]: It started very slowly, I made terrain for friends long after I stopped playing any miniatures games. I put a couple on eBay, and they sold well, but couldn't even come close to paying for the time that was invested in them. Then I got introduced to Hirst Arts molds, and I had great fun playing Legos with those. Then I got introduced to mold making, and I realized I could potentially mass produce what I had been building, so I thought I would give it a try. I don't really think of it as a business though, it's a self-sustaining hobby. And not even that, most of the time!
[TP]: How many Hirst Arts Molds do you have? Do you have multiples of any particular mold?
[Patrick]: I think I only have maybe 8 or so. I've given most of them away. I have a guy locally that does my builds or loose block casting for me, for a fee of course. I've also used Iain of CastleKits.com for casts, he does good work. I don't have enough time to do all steps of production, and casting takes a lot of room and is very time consuming. And frankly, it's not a lot of fun.
[TP]: What is your preferred casting material and why?
[Patrick]: I've used a lot of materials. I prefer Hydrostone right now. Picks up great detail, cheap, widely available, decently hard. Since I'm molding my models, the initial material doesn't really matter. If I were to sell the actual Hirst model instead of a casting of it, I would go with Tufstone or Merlins. Merlins is great if you don't plan on doing a ruined look like I do. It's SO HARD that it's actually difficult to dremel through. Tufstone is basically Hydrostone plus better impact resistance with some fiber content.
[TP]: You used kickstarter to raise capital for the business. How would you guage the success of that? Were you able to quickly raise the capital you needed or did it take time?
[Patrick]: Kickstarter exceeded my expectations, and exposed the gap between my "hobby" and what I was presenting as a "business". I got so many orders I couldn't fulfill them, and had to take things to the next step by outsourcing the production. I lost money on the Kickstarter project as a whole, but it gave me the kick in the pants to think bigger, so in the end I consider it highly successful. If you are considering a Kickstarter, I could go into a lot more detail about that.
[TP]: Your vision is to fill a table with terrain to make it resemble a gothic version of the ruined city of Osgiliath. How far are you along with this vision?
[Patrick]: Hah, not too far admittedly. I have quite a few pieces in the pipeline, but it will take me two years at this rate to have even a 6x4 table nicely covered. I'm very persistent though, and good at sticking to the vision - there are lots of possible distractions. And in my defense, I already have full time job, I'm in school part time, and my wife and I spend lots of time with our three children. I keep busy!
[TP]: Do you have any other Lord of the Rings inspired terrain ideas?
[Patrick]: I have tons of ideas. Ideas are not the problem here! Execution on those ideas while keeping mass production affordable is the hard part.
[TP]: When painting and dry brushing the terrain how many layers do you do? I have seen some people just do 3 colors and others do 4. What is your method to providing realism?
[Patrick]: I think I've got the painting down to a excellent level-of-effort versus time-spent balance. That's outsourced too, so other than coming up with the initial scheme, I don't do any of the actual painting. Right now it's just 4 steps: basecoat, details, a wash, and a drybrush.
[TP]: Ever messed up a piece so bad that you had to start over? What was the mistake and any lesson you learned?
[Patrick]: Not on the builds so much... I usually dry-stack so I know what I'm getting, or I use Google Sketchup with the guy who actually does the builds so we have an agreed upon piece before he starts. I've certainly messed a lot on the molding and casting and production side. Lots of trial and error there!
[TP]: What advice would you give to someone just starting out in this business?
[Patrick]: I wouldn't think of it as a business, unless you're planning on feeding your family doing it. Which I would advise against! You are unlikely to make a lot of money, given the time spent. If you're having fun doing it, though, it doesn't matter. I've found I enjoy the "business-y" aspects much more than I expected, almost as much as the creative bits. Things like outsourcing production, working on the website, finding cheaper or better component materials, etc. I'm just starting to look into marketing (I'm getting a big delivery of sets soon!) and that's pretty interesting as well.
Tuesday, April 24, 2012
Onyx Workshop: Amon Hen
I was going through the Onyx Workshop blog and found this spectacular post on a terrain board he built for a customer. It is of Amon Hen from the Fellowship of the Ring. It looks simply amazing. Check it out!!!
http://onyxworkshop.wordpress.com/about/amon-hen/
http://onyxworkshop.wordpress.com/about/amon-hen/
Wip: castle gate update 2
As you can see I have nit made a ton of progress. The weekend was way too sunny for me to start home in my shop. I plan to get more done during the week though. I added a second layer to the base if the first tower. This is to give new the height I need for the base of the bridge. I also created the main rails for the bridge and the floor and base layer for tower 2.
The first tower has some gaps in it including one bad one on the back window. After talking to some folks on the hirst arts message board I am going to use wood filler to fix the gaps before painting. The first run on the second tower went together a lot cleaner. I think this us because my casting has gotten better and my process for gluing.

Monday, April 23, 2012
Andaville Defensive Walls
This keep is large and impressive!!! It appears to be cast entirely in hirst arts molds. It is a great demonstration of what can be accomplished with a little imagination and time. I don't even want to think about how long it took to cast all of these blocks...
Friday, April 20, 2012
WIP: Castle gate update
Here is a pic of the first tower for the gate. The bottom floor is almost complete. This weekend I will start the second tower and building the bridge across. I also have enough basic blocks to start work on a wizard tower.
The casting process head gotten a lot better. Recent casts have almost no air pockets. Hopefully I can fix the vibration table this weekend and eliminate any more air pockets.

Subscribe to:
Posts (Atom)