I haven't had a lot of time to work on things this past week. Life has just been way too busy. I did however eek out a little bit of time yesterday to fix/finish off the vibration table. I used some foam and springs to dampen the vibration and things seem to work wonderfully now! I'll have some pictures up soon as well as brief how-to.
I have also switched over to the glass method of scraping the tiles and let me tell you it makes a WORLD of difference. I found some already cut acrylic sheets at lowes for about $3 each that are just the right size for a mold. I picked up 5 of them and plan on getting about 10 more tonight!
I am also now doing a syrenge method instead of pouring from the sides. I bought a bottle that I can squeeze the plaster out of to do this, it isn't an actual syrenge. I plan on going to the restraunt supply store soon and picking up a few more bottles of different sizes depending how much plaster I am working with.
Also I have found that going with a 2 to 1 ratio of plaster to water by volume seems to work out fairly well for overall strength. Now to get to casting a bunch more bricks!!!
Ohh on another note my adsense account was disable because of invalid clicks! Not sure what that is about or how they determine that but I have now switched ad providers and will be looking at finding better ad networks for this blog in the future!
Showing posts with label hirst arts. Show all posts
Showing posts with label hirst arts. Show all posts
Monday, June 4, 2012
Thursday, May 24, 2012
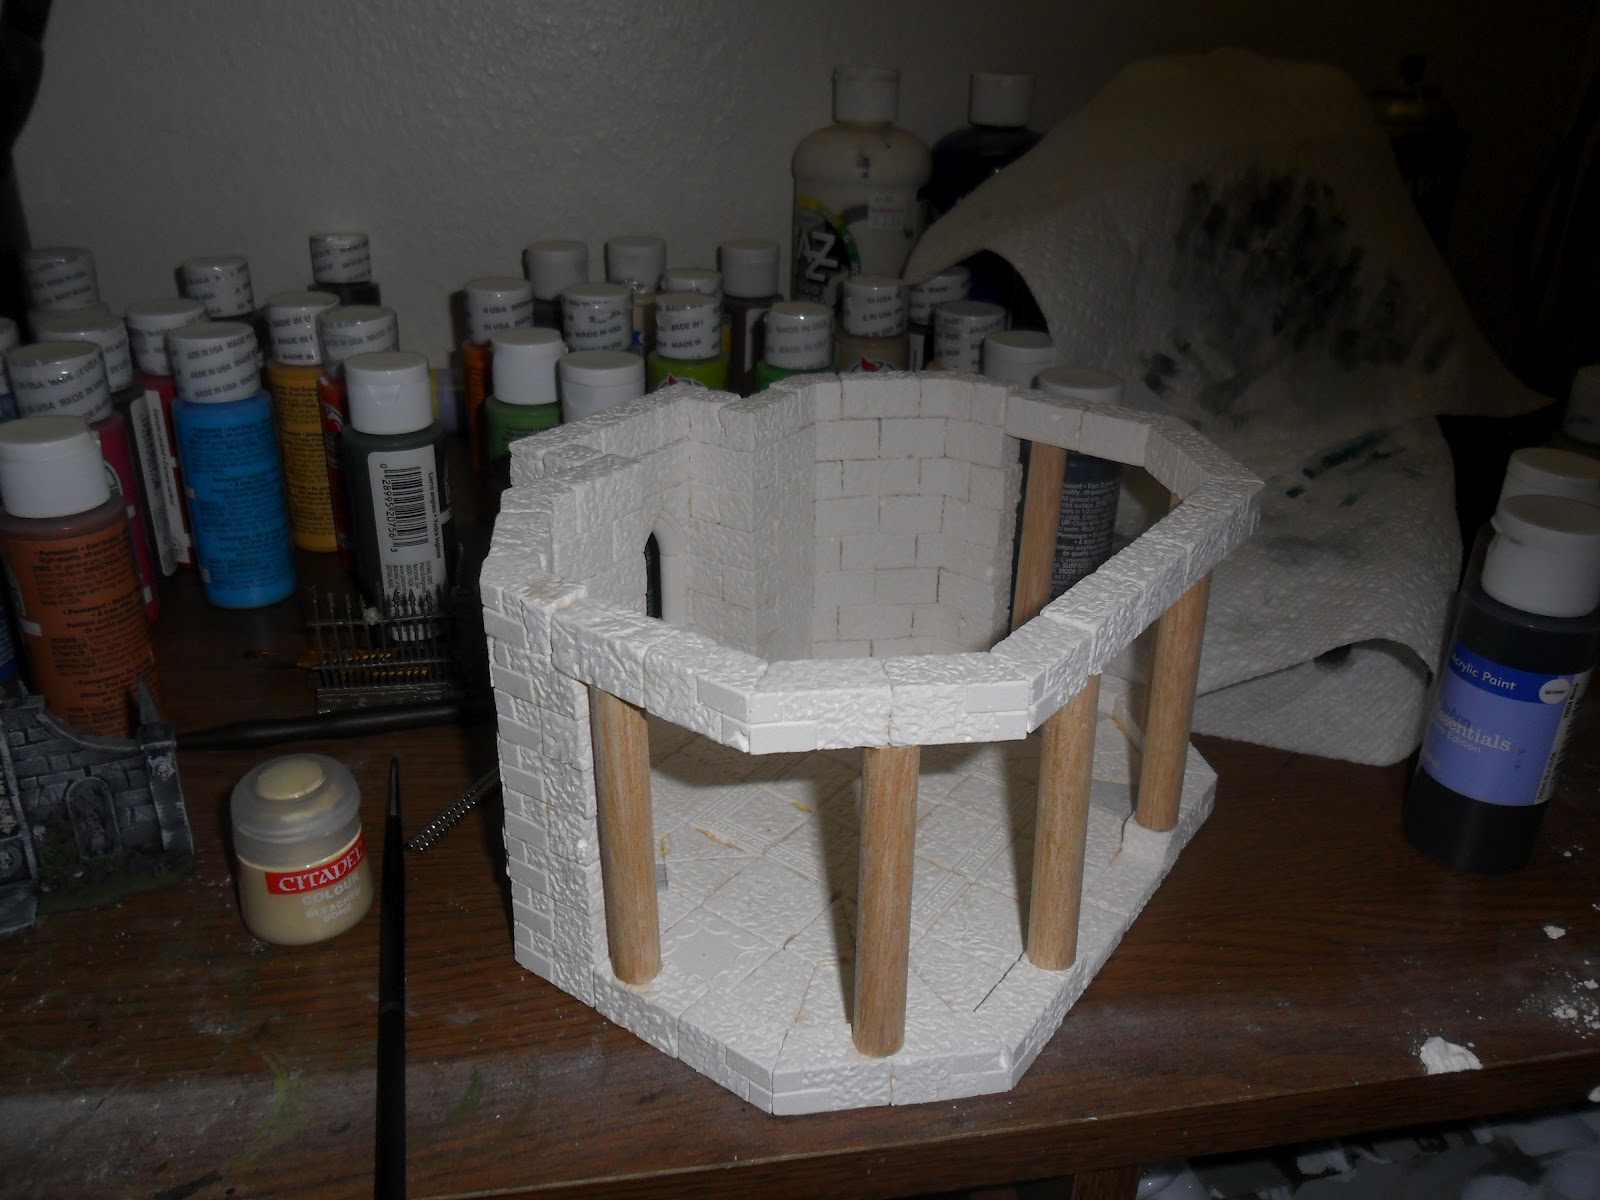
WIP: Temple of Aradoth update 2
Ok so I have finished the main temple. I might decide to put a roof on it but right now I like it open aired. I ran into some issue putting in the pillars and getting everything to line up the way I wanted. I tried dry building the pillar section upside down first and then putting all the pillars on at once but it didn't quite line up right. That's ok though, I am not concerned about high quality right now and mostly about getting designs completed and learning from the construction.
The piece is still going to look amazing once painted and placed on the base with the bridge. Here are some pics!


The piece is still going to look amazing once painted and placed on the base with the bridge. Here are some pics!


Saturday, May 12, 2012
WIP: Temple of Aradoth
Nestled high in the great mountains, the temples only access point is a bridge across a canyon. Before you can get to the bridge you must first climb the winding road... A treacherous pass prone to falling rocks.
Below is a picture of the floor foot print. I am using my new octagon tower layout as the inspiration. Also using a road I was on the other day for the inspiration for the treacherous pass!

Below is a picture of the floor foot print. I am using my new octagon tower layout as the inspiration. Also using a road I was on the other day for the inspiration for the treacherous pass!
Friday, May 11, 2012
Complete: Castle Gate
I had an itch that I just had to scratch so I went and finished the castle gate. I dry brushed on a couple coats of lighter gray did some flocking and added some trees and voala it is done! Here are some pictures for your viewing pleasure.


The camera is definately good at showing those tiny spots I missed... Must be the flash lol. Might do some touch ups but I think this is pretty good for the first model with hirst arts bricks!
Thursday, May 10, 2012
Large Octagon Tower
Someone asked how you could expand the octagon tower to add 2 inches to each side. Many solutions were proposed. I thought that you should be able to do it and maintain the original octagon pattern in the middle without cutting any bricks. However after much experimentation I could not find a pattern to do this... I did however come up with an entirely different solution.

This allows you to enlarge 4 of the sides to whatever size you want without having to entirely redo the pattern however you keep 4 of the sides the original pattern. I kind of like the footprint of this and might use it for a temple of some sort.

This allows you to enlarge 4 of the sides to whatever size you want without having to entirely redo the pattern however you keep 4 of the sides the original pattern. I kind of like the footprint of this and might use it for a temple of some sort.
Wednesday, May 9, 2012
WIP: Castle Gate Update 5
Ok so last night I had some time to take my gentle persuader (a.k.a hammer) and ruin up the gate piece I was working on. I made the decision to do this because the piece was just not going the way I wanted. I think I might of tried constructing something a little too big first!!! At an rate I ruined it up and put some rubble around the base and added a broken stair case. Check out the pictures below.


Monday, May 7, 2012
6 inch tower dome
Here is a picture of my first attempt at making a domed roof for the 6" tower or other applications. It is made from plaster and styrofoam and some cardboard. Working on a couple techniques for making it but I thought the first shot came out pretty good.


Sunday, May 6, 2012
Weekend Update...
Quick weekend update. I have spent most of my time organizing and casting. I am borrowing a few molds from a fellow wargames terrain enthusiest. This puts me at 16 molds being cast at a time. Below are some pictures of one of the casts and the workspace updates. Here are the molds all layed out ready for pooring.

Here is the bowl of plaster ready to poor...

And all the molds filled but not scraped yet

The corner of the shop where I built a new bench.

New bench and some poly bins are installed.

Tons of blocks ready to be sorted.


Here is the bowl of plaster ready to poor...

And all the molds filled but not scraped yet

The corner of the shop where I built a new bench.

New bench and some poly bins are installed.

Tons of blocks ready to be sorted.

Thursday, May 3, 2012
They are here!!!
The new molds I ordered the other day are here. This will fill out my collection nicely and give me a lot more flexiblity in my projects. I can't wait to start casting them tonight!!!
Wednesday, May 2, 2012
Wip: castle gate update 3
I have the first part of the bridge house done. Working on the second level of the towers. Work is slow but steady. I will have some other small pieces done here soon as well.

Monday, April 30, 2012
New Molds OTW
So I decided to buy some new molds. I am still working on the gate project (I will post an update on that later tonight) but I also have a couple other smaller projects comming up to work on. I went with 5 molds this time to get the 10% discount. Here is what I bought:
#53 Travelers Bridge Mold
#60 Prison Tower Mold
#54 Gothic Church Mold
#200 Wall Builder
#61 Turret Mold
Hope they get here this weekend!
#53 Travelers Bridge Mold
#60 Prison Tower Mold
#54 Gothic Church Mold
#200 Wall Builder
#61 Turret Mold
Hope they get here this weekend!
Friday, April 27, 2012
Interview: Patrick from Advanced Terrain
For my first interview I talked with Patrick. He is the owner operator of http://www.advancedterrain.com/ which is making highly durable terrain pieces based off of Hirst Arts molds.
[TP]: What inspired you to create a business building wargame terrain?
[Patrick]: It started very slowly, I made terrain for friends long after I stopped playing any miniatures games. I put a couple on eBay, and they sold well, but couldn't even come close to paying for the time that was invested in them. Then I got introduced to Hirst Arts molds, and I had great fun playing Legos with those. Then I got introduced to mold making, and I realized I could potentially mass produce what I had been building, so I thought I would give it a try. I don't really think of it as a business though, it's a self-sustaining hobby. And not even that, most of the time!
[TP]: How many Hirst Arts Molds do you have? Do you have multiples of any particular mold?
[Patrick]: I think I only have maybe 8 or so. I've given most of them away. I have a guy locally that does my builds or loose block casting for me, for a fee of course. I've also used Iain of CastleKits.com for casts, he does good work. I don't have enough time to do all steps of production, and casting takes a lot of room and is very time consuming. And frankly, it's not a lot of fun.
[TP]: What is your preferred casting material and why?
[Patrick]: I've used a lot of materials. I prefer Hydrostone right now. Picks up great detail, cheap, widely available, decently hard. Since I'm molding my models, the initial material doesn't really matter. If I were to sell the actual Hirst model instead of a casting of it, I would go with Tufstone or Merlins. Merlins is great if you don't plan on doing a ruined look like I do. It's SO HARD that it's actually difficult to dremel through. Tufstone is basically Hydrostone plus better impact resistance with some fiber content.
[TP]: You used kickstarter to raise capital for the business. How would you guage the success of that? Were you able to quickly raise the capital you needed or did it take time?
[Patrick]: Kickstarter exceeded my expectations, and exposed the gap between my "hobby" and what I was presenting as a "business". I got so many orders I couldn't fulfill them, and had to take things to the next step by outsourcing the production. I lost money on the Kickstarter project as a whole, but it gave me the kick in the pants to think bigger, so in the end I consider it highly successful. If you are considering a Kickstarter, I could go into a lot more detail about that.
[TP]: Your vision is to fill a table with terrain to make it resemble a gothic version of the ruined city of Osgiliath. How far are you along with this vision?
[Patrick]: Hah, not too far admittedly. I have quite a few pieces in the pipeline, but it will take me two years at this rate to have even a 6x4 table nicely covered. I'm very persistent though, and good at sticking to the vision - there are lots of possible distractions. And in my defense, I already have full time job, I'm in school part time, and my wife and I spend lots of time with our three children. I keep busy!
[TP]: Do you have any other Lord of the Rings inspired terrain ideas?
[Patrick]: I have tons of ideas. Ideas are not the problem here! Execution on those ideas while keeping mass production affordable is the hard part.
[TP]: When painting and dry brushing the terrain how many layers do you do? I have seen some people just do 3 colors and others do 4. What is your method to providing realism?
[Patrick]: I think I've got the painting down to a excellent level-of-effort versus time-spent balance. That's outsourced too, so other than coming up with the initial scheme, I don't do any of the actual painting. Right now it's just 4 steps: basecoat, details, a wash, and a drybrush.
[TP]: Ever messed up a piece so bad that you had to start over? What was the mistake and any lesson you learned?
[Patrick]: Not on the builds so much... I usually dry-stack so I know what I'm getting, or I use Google Sketchup with the guy who actually does the builds so we have an agreed upon piece before he starts. I've certainly messed a lot on the molding and casting and production side. Lots of trial and error there!
[TP]: What advice would you give to someone just starting out in this business?
[Patrick]: I wouldn't think of it as a business, unless you're planning on feeding your family doing it. Which I would advise against! You are unlikely to make a lot of money, given the time spent. If you're having fun doing it, though, it doesn't matter. I've found I enjoy the "business-y" aspects much more than I expected, almost as much as the creative bits. Things like outsourcing production, working on the website, finding cheaper or better component materials, etc. I'm just starting to look into marketing (I'm getting a big delivery of sets soon!) and that's pretty interesting as well.
Tuesday, April 24, 2012
Wip: castle gate update 2
As you can see I have nit made a ton of progress. The weekend was way too sunny for me to start home in my shop. I plan to get more done during the week though. I added a second layer to the base if the first tower. This is to give new the height I need for the base of the bridge. I also created the main rails for the bridge and the floor and base layer for tower 2.
The first tower has some gaps in it including one bad one on the back window. After talking to some folks on the hirst arts message board I am going to use wood filler to fix the gaps before painting. The first run on the second tower went together a lot cleaner. I think this us because my casting has gotten better and my process for gluing.

Monday, April 23, 2012
Andaville Defensive Walls
This keep is large and impressive!!! It appears to be cast entirely in hirst arts molds. It is a great demonstration of what can be accomplished with a little imagination and time. I don't even want to think about how long it took to cast all of these blocks...
Friday, April 20, 2012
WIP: Castle gate update
Here is a pic of the first tower for the gate. The bottom floor is almost complete. This weekend I will start the second tower and building the bridge across. I also have enough basic blocks to start work on a wizard tower.
The casting process head gotten a lot better. Recent casts have almost no air pockets. Hopefully I can fix the vibration table this weekend and eliminate any more air pockets.

Tuesday, April 17, 2012
Helms Deep
A member of the hirst arts forum posted a link to a project of helms deep someone did. Since I am attempting to do Minas Tirith I figured I would blog about their Lord of the Rings inspired project as well. You can check it out at: http://onyxworkshop.wordpress.com/about/helms-deep/
He has a really long list of molds listed to accomplish the project. After looking over the pictures I think you can do what he has done with just 5 molds: Wizard Tower, Octagon Tower, Prison Tower, Ruined Tower, and Gothic Bridge. That should give you all the pieces I could identify with a few exceptions such as the round pillars used. These however could easily be replace with the pillars from the ruined tower and still look good. Also you do not get the wall molds, however with a bit of effort you can cut basic blocks in half and make thinner walls out of them.
Overall the project was very well done. Makes me want to try and tackle it before I do Minas Tirith... One project at a time I guess. All spare time is going to casting blocks and learning the tricks to get good casts.
Castle Gate Update
So last night while working on my taxes I got some work done on the towers for the gate. I also created a base for the keep out of some polystyrene insulation that was a half inch thick. The base is 24" x 11" so it will have plenty of space for some trees and maybe a statue or something else on it. I will post pictures of my progress later when I have a bit more assembled.
Another note, I decided to put together the floors upside down. That way I can sand the bottoms to make it even and have a flat surface. Also to make some square floor tiles I took some standard blocks and cut them down the middle (giving me 2 usable pieces) with a small hack saw. It isn't really a hack saw but it is similar and I am not sure what the saw is actually called.
More casting to be done tonight!
Monday, April 16, 2012
Casting and Taxes
So I have to finish off my State and Federal taxes tonight... blarg... I hate doing taxes. I wonder how many casts I can get done while doing my taxes though. I did about 8 over the weekend. Far short of the 40 I need to get done. I also may need to order more merlins magic to complete the project. I think I will get a larger quantity of it this time... I do enjoy the casting. I am Also thinking about getting a few silicone cups for mixing the plaster.
Sunday, April 15, 2012
Gate Foot Print
 So I took a bunch of the casts I have done recently and did a quick dry fit to get the foot print of the gate checkpoint I am building. Based on this I was able to take a quick measurement to determine the base size I would need to make. The piece will be 17" x 6" so I am going to put that on a 24" x 12" base. This will leave me lots room to add trees and other details. I also plan to put 3.5 inch road between the towers. This will hopefully match up with the modular roads you can buy from terranscapes.com.
Friday, April 13, 2012
Hirst Molds Wish List
I am constantly looking at the molds trying to determine which ones to get next. So far I think my list looks like this.
#53 http://hirstarts.com/bridge/bridge.html
#60 http://hirstarts.com/pristowr/pristowr.html
#61 http://hirstarts.com/turret/turret.html
#64 http://hirstarts.com/round/round.html
#65 http://hirstarts.com/ruin/ruin.html
#203 Cracked Floor Tiles
#205 Gothic Floor Tiles
#206 Worn Floor Tiles
#235 Gothic Roof Mold
#245 Slate Shingle Roof Mold
#250 Small Brick Mold
#41 http://hirstarts.com/tips15/tips15.html#41
#42 http://hirstarts.com/tips15/tips15.html#42
#43 http://hirstarts.com/tips15/tips15.html#43
#44 http://hirstarts.com/tips15/tips15.html#44
#54 http://hirstarts.com/church/church.html
#55 Bell Tower
#200 http://hirstarts.com/tips/tips.html#wall
As you can see that is about 20 different molds... That is a pretty penny if I were to try and get them all at once. So I definately need to break it down a bit. I was hoping to be able to get 5 at a time but I am not sure if I will be able to do that. So my thought is to break it down based on what goes together and versatility. If a single mold lets me make a cool terrain piece it gets higher priority. I want to make sure I am getting at least 2 molds at a time so here is how I think I will break them down by pairs.
#53, #60
#61, #206
#64, #200
#55, #41
#54, #235
Obviously this doesn't cover all the floor tiles and accesory molds I want however this would give me a total of 8 different hirst arts designed projects to make (including the 2 I already have) and allow me to work on a bunch of pieces for Minas Tirith. I just hope that once I make some of these projects I can sell them for a decent price to be able to afford more molds and tools.
Subscribe to:
Posts (Atom)